How to conduct 360 feedback surveys?
360 feedback survey (360 review or 360-degree feedback) is a survey that solicits feedback on an employee’s performance from several different sources: managers, peers, direct reports, and self-assessments. It can also be updated with additional sources: customers and suppliers. In this case, it is called a 540 feedback survey.
This is a step-by-step manual for 360 survey creation and management in SurveyLab.
- Create survey
- Use piping to personalise your survey
- Logic
- Create collector
- Create a file with contacts
- Import the file with contacts
- Activate collector
- View report
1. Create survey
Create a survey and add points for the answer choices. System will need this information for data aggregation and metrics calculation.
Divide the survey into pages. The system will use this information to create groups (eg. leadership, strategy, focus on results, …) and present them on the spiders’ graph.
Supported question types :
- Choice question
- Matrix question
- Open-ended question
2. Use piping to personalise your survey
Piping (Data inserting) enables dynamic changes in the survey based on the given answers or data assigned to the contact. When creating piping for 360-degree surveys, write {assessedPersonCustom1} instead of {custom1}. This way, the system will know that it needs to insert data from a contact that is being assessed.
| Standard survey (Feedback provider data) | 360-degree survey (Assessed person data) |
|---|---|
| {firstName} | {assessedPersonFirstName} |
| {lastName} | {assessedPersonLastName} |
| {email} | {assessedPersonEmail} |
| {phone} | {assessedPersonPhone} |
| {custom1} | {assessedPersonCustom1} |
| {custom2} | {assessedPersonCustom2} |
| {custom3} | {assessedPersonCustom3} |
| {custom4} | {assessedPersonCustom4} |
| {custom5} | {assessedPersonCustom5} |
| … | … |
| {custom40} | {assessedPersonCustom40} |

3. Logic
EXAMPLE. To create logic according to Relations, for example, to hide block “B4 Service” for contacts group “Clients” :
- Add logic Hide block, choose B4 Service.
- Press button + ADD LOGIC, and then CONTACT.
- Choose Relation from the first list and Client from the second.
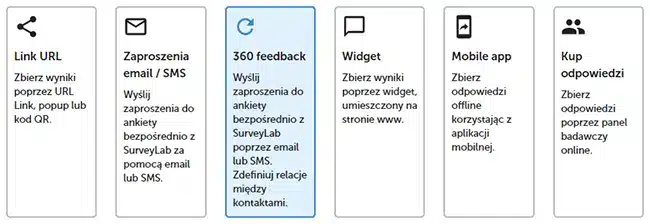
4. Create collector
To create a new collector :
- Go to Collect responses page.
- Press the + ADD COLLECTOR button.
- Select option 360 feedback in the collector settings.

NOTE. If you select the Anonymous report option in the collector settings, the final report will be fully anonymised. It also means you won’t be able to see personal data (Email, Phone, FirstName, LastName) on the list of reports, or use piping elements containing personal data in the report.
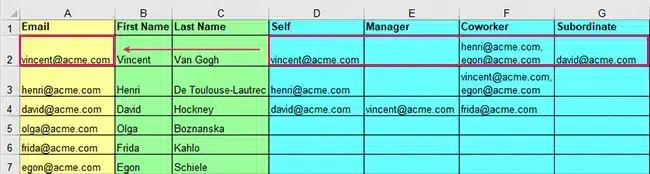
5. Create a file with contacts
360-degree research starts with creating a .CSV, .XLSX (Excel), or .ODS (OpenOffice) file with contacts.
| 360 Survey | Contacts template (Google Docs) | |
| 360 Survey | Contacts template (Excel) |
The file must contain an “Email” column with unique emails for each contact.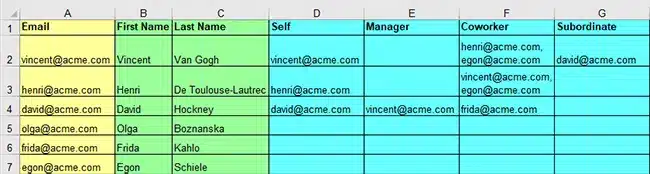
EXAMPLE. In the example below, Vincent will be evaluated by 4 people. The survey will be sent to himself, two coworkers, and a subordinate.
NOTE. Emails in the fields Coworker, Manager, and Subordinate can be separated by commas or enters.
A table can be modified depending on your needs. The column order is optional. For the data to be imported correctly, you must enter the column names exactly as in the example.
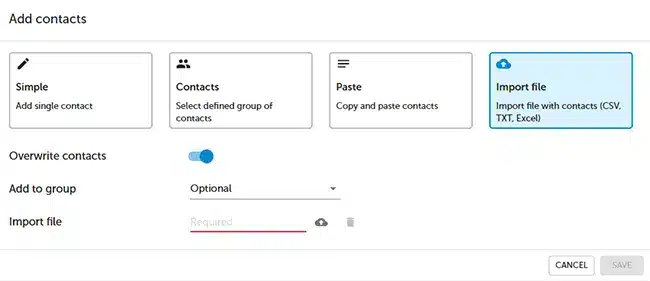
6. Import the Excel file with contacts
To import the Excel file with contacts :
- Press Respondents button.
- Press + ADD CONTACTS button.

- Press Import file and select the right file on your computer.

- Match columns with contacts and press SAVE button.

7. Activate collector
To verify the correctness of the previous steps, check if the number of contacts is the same as the number of planned survey dispatches.
If everything is correct, press Start collecting responses to activate the collector and send a survey invitation.
NOTE. If you started data collection, don’t remove your contacts from the collector. This action will deactivate all links sent in the survey invitations to your respondents.
8. Reports
Set up the report. The setup in one selected 360 report will impact all 360 reports created within the collector.
To view 360 reports :
- Press Report list button.
- Select report marked as 360.
Focus areas
Focus areas can help you automatically recognise areas that need the attention of the assessed person.
| Area | Description |
|---|---|
| Matching strengths | When your assessment and Others’ assessment match, and both are high. |
| Blind spots | When your assessment is lower than Others’ assessment. |
| Overrated areas | When your assessment is higher than Others’ assessments. |
| Areas to improve | When your assessment and Others’ assessment match, and both are low. |
NOTE. 360 reports are normalised (take values between -100 and 100) and are calculated with the formula :
gained number of points
—————————————— x 100
max number of points
![]() Functionality is available in the Enterprise plan.
Functionality is available in the Enterprise plan.